Riportiamo di seguito un articolo pubblicato nel giornale Il Sole 24 Ore e nella rivista Platinum.
“Anticipare il problema per arrivare alla soluzione, è questa la mission di Tecninf Spa, società che fornisce soluzioni in ambito ICT. La grande trasformazione nel 2016 quando da Srl si è trasformata in Spa e ridefinendo le nuove strategie commerciali in collaborazione con i system integrator sulla PAC. “Il nostro fatturato – spiega il presidente Maurizio De Santis – ha avuto una crescita anno su anno del 25%. Siamo passati da 1 milione di euro del 2016 ai 3,5 milioni di euro di fine anno. Il nostro perimetro riguarda le tecnologie informatiche più evolute, sistemi di IA applicata alla cyber security fino al machine learning e alla realtà aumentata. Stiamo inoltre valutando l’acquisizione di altre aziende per incrementare le risorse umane vista la crescita sui mercati”.
La sede centrale di Tecninf è a Roma; a ottobre ha aperto una sede a Miami ed è prossima una sede nei Paesi del Golfo. Due i prodotti di punta: il DefCon One e gli Samrt Tools, sistemi di analisi di sicurezza delle infrastrutture ITC. “Il primo – spiega l’amministratore delegato Jutatip Boontawee – è un anti-malware completamente italiano, in grado di intercettare quelli che vengono chiamati gli ‘zero days’. La nostra competenza su CS e IA ci ha consentito di realizzare un prodotto che identifica il malware su base comportamentale indipendentemente se sia stato registrato o meno in precedenza. Per intenderci Defcon One avrebbe potuto contrastare gli ultimi attacchi informatici, passati alle recenti cronache”. “Il secondo, Smart Tools, è una suite composta da vari moduli: tra i principali, l’analisi degli attacchi che contrattacca immediatamente l’invasore. Degno di nota – prosegue il direttore commerciale Roberto Cao Pinna – è un altro modulo di questa suite denominata Dark Criminal Intelligence che fa un’analisi nel deep web e nel dark web di tutte le potenzialità di attacco di un target e prepararlo alla difesa”.
Di fronte al conflitto in corso, il Governo italiano ha deciso di attuare una serie di misure urgenti tra queste le modifiche alla normativa di Golden Power per un nuovo rafforzamento dello scudo tecnologico. Tecninf Spa vanta uno dei primi laboratori di sicurezza del 5G che fa analisi di infrastrutture di rete proprio sull’interazione con questa nuova tecnologia, che si è una grande opportunità ma, al contempo, apre a una serie di problematiche di sicurezza cui i sistemi attuali non sono preparati”.
One of the central professions in the computer world is the Java developer. It is in fact an extremely requested figure, since the Java language, which dominates 4% of the world market. The second language of computer programming in the business environment most used by multinationals and companies, especially in the e-commerce and banking sector, it is preferred, despite being difficult to manage and learn, above all for its robustness and therefore for the ability to withstand a large number of users.
In fact, deciding to invest in a career in Java programming allows you to take different paths, entering many sectors of the national and international market, from security to banking, from the world of videogames to that of mobile applications, and many more.
THE JAVA PROGRAMMER AND THE IMPROVEMENT OF TECNINF
The work of a Java programmer develops on several levels
front-end developer that is the person who takes care of the user interface, in other words that part of the website with which the user interacts;
back-end developer instead indicates a developer who creates the foundations of a site, that part that the end user will never see but which is the basis of his browsing experience;
full-stack developer is instead the most complete programmer figure, since he has knowledge and skills both for the front end and back end side.
It is a difficult profession but full of stimuli: it is necessary to have an analytical, precise, scrupulous approach and have problem solving skills. With our specialization course, Tecninf focuses on the full-stack developer, refining and perfecting skills already in the possession of the participants, in order to offer a complete and in-depth preparation.
In fact, working with our projects, the Java developer will have to deal with websites, applications and databases with large user bases, and will therefore have to conduct tests, debug activities to correct malfunctions, intervene on codes developed by others.
How to get started? What are the training courses to undertake to meet the needs of the market? Surely a degree in computer science is a great starting point but, as in all professions, you never stop learning. And above all, experience “in the field” is fundamental.
We at Tecninf offer free training courses which, in the case of valid and suitable candidates, will result in a recruitment process. Our courses allow participants to gain “on the job” experience within company teams. To access it is necessary to have knowledge of programming logic, basics of JAVA, Database (sql) and be in possession of a Diploma or a Degree in IT disciplines
WHAT WE DO IN TECNINF COURSES
Candidates are supported by specialized tutors who will help them participate in the design, analysis and development of the code with the most popular methodologies and framework . Within the course, “design work” sessions are structured, which fully simulate a project and the entire life cycle of a software, dealing with topics, technologies and methodologies of working environments. A few examples? Among the skills that our candidates acquire are:
analysis and collection of requirements
front end and back end programming
testing and bug fixing phase
UAT
deploy
Activities that are accompanied by the study, deepening and application of the Java Base and Advanced and Web language, on Hibernate, Spring, Angular and database design and modeling.
At the end of the course, participants who have shown willingness to learn, seriousness and passion will enjoy another opportunity: that of being included in important company projects with a work contract.
For the “knowing them to fight them” series, we will see in this article how to inject malware into an Android application. At the end of 2017, Grabos alone, a malicious code present in over 150 apps on the Play Store, infected more than 17 million Android users (source: mcafee.com ) and it is neither the first nor the only malware present on the Play Store hidden inside unsuspected applications (Figure 1, source: av-test.org ).
Figure 1
It is therefore evident that this is a very common threat. To perform an analysis of an infected application, you must first understand how the attackers act: below we will see in detail how a normal mobile application can be altered by inserting hostile code.
Disassemble an application
What needs to be done to turn a legitimate application into a malware application? First you need to choose an app to infect. To download the application, if we don’t have an Android device at hand, you can use a service like APK Downloader ( https://apps.evozi.com/apk-downloader/ ) or similar.
In order to understand how it works, a simple app is sufficient, but in general, when the target is not obliged, it is preferable to infect an application that already requires the permissions necessary for the malware in order not to make the user suspicious. .
After downloading it, you need to disassemble the application, so you can modify it at will. To carry out the procedure we use Apktool (see Box 1) obtaining the files in Figure 2 (the figure shows the output of APK Tool used through APK Studio ).
Figure 2
Among the files produced, the ones we are interested in are contained in the smali / directory, which includes all the application files written in Smali , where Smali em> is a Jasmin based language that disassembles a .dex file into a more readable format.
The .smali files reflect the behavior of the original application but have a flaw, namely that since Smali is not a high-level language, it is not immediately readable.
If, on the other hand, we want to understand roughly how the app is made and how it behaves, a tool like dex2jar which transforms a .dex file into a JAR archive is more useful (Figure 3).
Figure 3
JAR archive that can be parsed with a simple Java decompiler such as JD-GUI. The .class files produced are generally less reliable than the .smali files and, moreover, with this operation, it is not possible to rebuild the APK.
Box 1: Apktool
Apktool is a tool to reverse engineer Android binaries. In practice, it allows you to disassemble the app and, more importantly, allows you to rebuild the APK file after making any changes.
The main commands are
apktool d to disassemble
apktool b to rebuild the APK.
In addition to the smali directory, which is of particular interest to us when disassembling a file, we also have the original and unknown directories:
original contains the META-INF folder and the xml file that are needed when we want to rebuild the app while keeping the original signature;
unknown contiene i file e le cartelle che non sono parte di AOSP (Android Open Source Project).
Prepare the malware
After disassembling the original application, the next step is to write the malware application in Java with Android Studio. For simplicity, let’s create a very basic malware, let’s go to “classic”: in this example we will write an application that reads SMS and forwards them via email to an address chosen by the attacker.
If the malware application needs additional permissions compared to the host application, these must be requested in the manifest; in the latest versions of Android they must also be checked, and possibly requested, at runtime respectively with ContextCompat.checkSelfPermission () and ContextCompat.requestPermissions () (in this regard see https://developer.android.com/training/permissions/requesting.html for more details).
The malware to send an email does not use an Intent nor does it make the user choose which client to use, but does everything in the background using the GMail mail server (smtp.gmail.com). What we need therefore is a class that inherits from BroadcastReceiver and that does nothing but listen for the arrival of an SMS. When a message arrives, it extracts the sender ( msg_from ) and the content ( msg_body ) and sends an email:
Where SendMail is a class that takes care of sending emails and internally uses the JavaMail API ( javax.mail. * ). Instead, the manifest must specify the receiver and the action associated with it as follows:
At this point, let’s build the APK with Android Studio and try it on the emulator: if everything works as expected, we disassemble the newly created application, in order to have Smali code for our malware to inject.
Inject the code and rebuild the application
Let’s now transform the legitimate application into a malware application. To do this, simply copy the contents of the smali / directory (except android / ) of the malware code into the smali / directory of the host application; we will do the same for the files in unknown / .
After entering the necessary code, we can recreate the application.
In order to install it, we need to sign it: you can use Uber APK Signer from the command line or through APK Studio ; alternatively we can directly use APK Signer and Zip Align .
We use APK Studio to build (with APK Tool ), sign (with Uber APK Signer ) and optimize (with Zip Align em>) the application that is now ready to be installed or, possibly, to be loaded on the Play Store.
Install and test the application
Figure 4
Also in this case, installation can be done through a graphical tool such as Apk Studio or directly with the install command of ADB .
In summary, to add hostile code to an app we need:
Disassemble the guest app with APK Tool
Writing malware with Android Studio
Building the malware APK with Android Studio
Disassemble the malware with APK Tool
Copy the malware’s smali / directory to the host app’s directory
Build, sign and optimize the app obtained with APK Studio
Install the app with ADB
They seem like many steps but, even if cumbersome, they are all very simple and immediate. We normally run the application, which will continue to do its job, but the first SMS received is triggered by the malware behavior: it will send an email and the body will indicate the sender and the text of the message.
Who knows how many times we have seen – in shops, clubs or public parks – signs indicating the presence of free WiFi networks or accessible through a simple “like” on Facebook. In all likelihood, each of us has used these services at least once, either out of necessity or simply for what is now a natural attitude to stay connected to the internet.
So why don’t these networks have a good reputation? And how are they exploited by malicious users? In the rest of the article we will analyze and create a typical potential scenario with the aim of intercepting sensitive information entered by the unsuspecting user. In short, the classic username / password combination.
Since the possibility of intercepting traffic and interesting data in clear text – therefore not encrypted by the well-known HTTPS protocol – by means of network sniffers (such as wireshark , xplico , ferret ) are rather scarce due to the increasingly stringent security policies adopted by browsers and operating systems, we will work in a much more effective phishing attempt: on the other hand it is well known, the weak link of a computer system is always in front of the screen!
Once again, we specify that carrying out the practices shown below outside of simulated environments or towards non-consenting subjects, may mean incurring the requirements referred to in articles 616 , 615- ter , 615-quater , 617-sexies , 640-ter of our Criminal Code.
Let’s start by configuring one of the most famous frameworks in the field of wireless attacks on our Linux distribution, namely the wifiphisher project:
We find the tool already pre-installed in WifiSlax , an excellent operating system of Catalan origins dedicated to the pentesting of WiFi applications. We must then equip our system (even as a virtual machine) with at least a second WiFi network card that allows packet injection and monitor mode . If we are using VirtualBox as a virtualization platform, just click on the appropriate menu and check the device:
We launch the program in its basic use with the command:
sudo wifiphisher
A first method provides for the possibility of cloning an Access point – and creating the so-called Evil twin – by sending packets in order to deauthenticate all clients connected at that moment and then force them to reconnect to the AP created by ours script. After changing the MAC address of the attacking network card to ensure a minimum of anonymity, we select the target network to be cloned from those proposed in the menu:
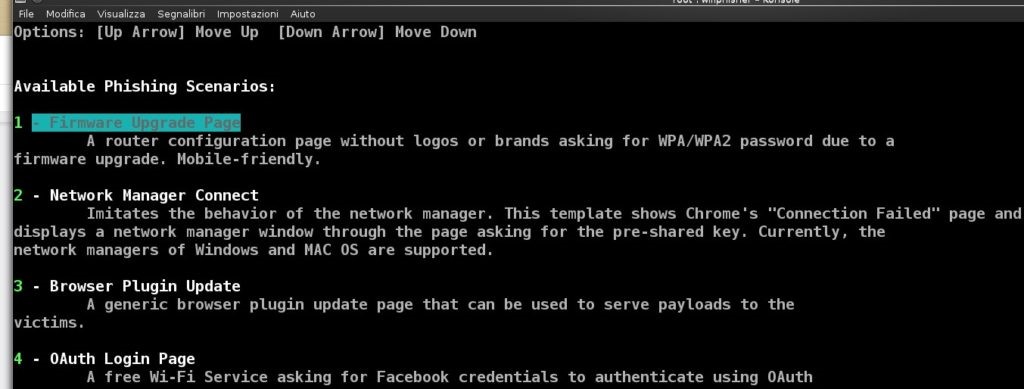
Four possible scenarios are made available with which to lure the victim client; in this case, we select the number 4 – OAuth login Page :
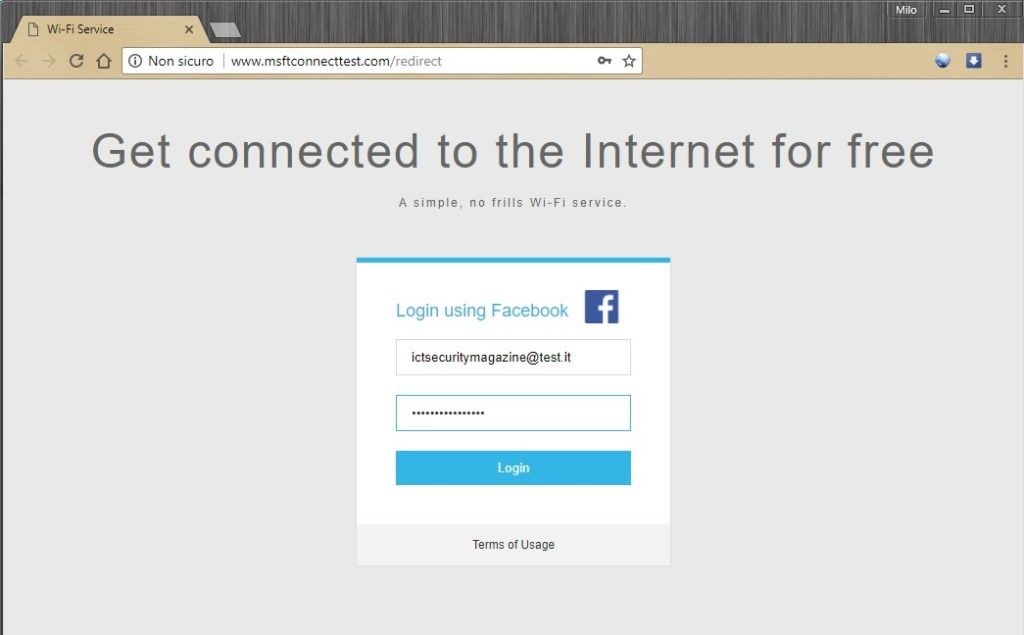
An interesting aspect of this attack method is that everything happens automatically and rather hastily: the victim will see a window of their browser – both desktop and mobile – appearing, which requires the insertion of credentials in order to continue browsing ( in this case those of Facebook):
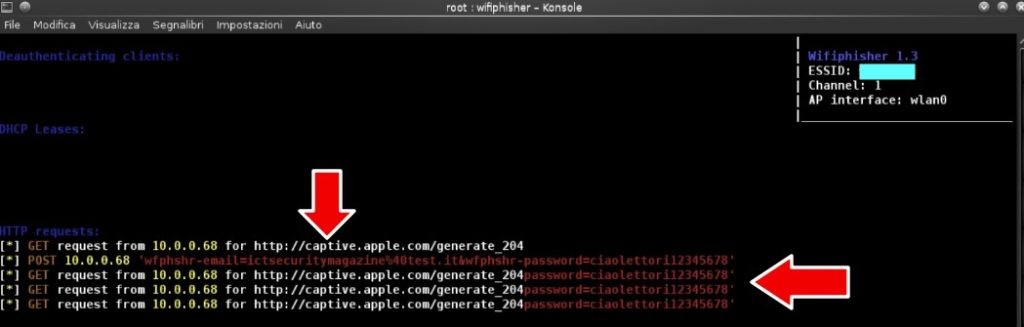
And here’s how the program’s terminal will return the victim’s email address and password:
If we wanted to be even more diabolical and increase the chances of success, we could modify the HTML tags of the web page to our liking, perhaps inserting a more captivating title in Italian or making the URL generated by the web server even more credible. We find the folders of the HTML pages of the server at the path:
wifiphisher/data/phishing-pages
A second very effective method of the framework, instead, provides for the creation from scratch of an open WiFi hotspot to be left active while waiting for an unfortunate user looking for an internet connection. Furthermore, the wifiphisher community has worked to expand the number of scenarios of the latter type of attack, making available the following material:
We copy the downloaded folders to the path indicated above and relaunch the initial installation script to also have these operational add-ons. So let’s run the program with the following syntax, specifying the name of the network to be used as a trap and that of the web page of the desired scenario (parameter -p):
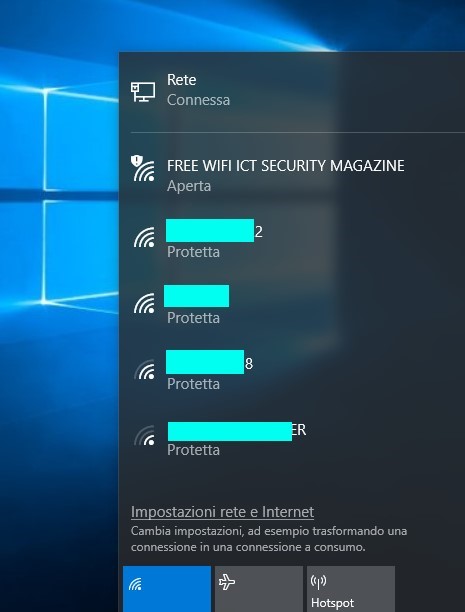
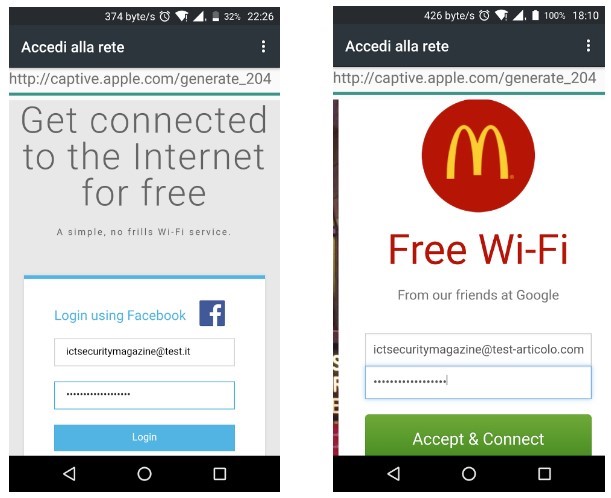
The victim will detect a new network from their device: as you can see from the following screenshots, the fake login mask appears in the foreground even with Android devices:
After seeing what a potential attacker can do, we ask ourselves what we can do as a conscious internet user to avoid nasty surprises. In this case, the world of software only partially gives us a hand: it is possible that some antivirus generically warns of the danger of a new network detected, but it certainly will not stop the user entering credentials. Not even a VPN protects us from malicious interception: the encapsulation of internet traffic will only take place after connecting to the Access point, and therefore when we have already entered our precious data.
On the other hand, it is certainly useful to keep your browsers updated and pay attention to the automatic compilation that they often propose in front of new forms: various URLs and pop-ups must always be examined with due expertise, pressing enter only when we are sure to send our data to legitimate recipient. Finally, for the most sensitive sites it is advisable to implement the double authentication mechanism via SMS or six-digit disposable token generated by smartphone applications.
The word Botnet comes from roBOT NETwork . As the term already anticipates, it is a network made up of compromised computer devices (therefore infected by Malware ) and connected to the Internet, controlled by a single entity, the botmaster . A botnet can have both benevolent and malicious purposes, and can:
act on a large computer network remotely;
automatically analyze the devices and networks connected to them;
The attacker needs, first of all, a compromised and infected machine to use as zombie . The Bot is programmed to search for other vulnerable devices, infect them in turn and thus creating a large network of compromised targets.
The attacker creates a C&C center ( commands and controls ) by configuring and forcing the various hosts to connect and wait for instructions. Through that center it is now possible to command them simultaneously, launch D attacks DoS (Distributed Denial of Service) or infect other devices.
Main types of botnets:
Centralized : they are controlled by a single C&C, which issues the commands and controls them in total. However, if the botmaster is tracked down and rendered harmless, they will no longer perform their function;
Decentralized (via p2p): they are linked together as a network of peers and each gives orders to neighboring nodes. In this way, even if one is stopped, the others continue to do their job anyway.
The simplest way to control a botnet is to connect each bot to a remote server. In this case, a single control source could send commands and updates with synchronous or asynchronous communication methods, which differ as follows:
Asynchronous: based on HTTP, it foresees a connection to a Web server to load / execute instructions at predefined intervals;
Synchronous: based on IRC (Internet Relay Chat), it consists in establishing a persistent channel (chat) between the bots and the IRC server to receive commands in real time.
The centrality of these configurations makes them, however, particularly vulnerable. In fact, to annihilate the functionality of the entire botnet it would be enough to simply identify and obscure the C2 server (HTTP / IRC).
Hackers’ choices
Hackers are therefore faced with several choices:
The ability to implement a peer-to-peer (P2P) distributed communication mode . In this scenario, where a zombie device can act as both a bot and a C2 server, there is no point of reference from which the bots get their instructions. The latter configuration, although less widespread due to the construction complexity, would be less vulnerable to a possible counterattack. It would be more problematic to obscure all bots to destroy the functionality of the entire botnet;
The possibility of implementing a mixed communication mode . A good solution could be to adopt a configuration trying to reap all the advantages of centralized / P2P control modes. For example, creating a P2P botnet to communicate with C2 servers via HTTP protocol;
The possibility of implementing a communication mode using the TOR network . This network, as known, being encrypted and designed to be anonymous would allow to hide botnet actions. End of form
Objective of Botnets:
Allow the simultaneous action of hundreds of thousands of devices that could be used by botmasters for different purposes:
to perform DDoS attacks (Distributed Denial of Service) on Web servers, targeting a website with anomalous traffic, in order to overload the services by blocking their operation;
for spamming . In fact, botnets appear to be the main means used for this purpose;
for web fraud . The simulation of clicks on advertising links or the loading in the background of websites (perhaps unrelated to these activities), could be a source of fraudulent profits, if these sites pay based on the number of clicks or views;
to mine Bitcoin , using the computing power of zombie computers;
to distribute other malware . As we have seen, botnet infections spread through malware / Trojans which, by identifying the vulnerabilities of outdated (or outdated) firewall or antivirus systems, download other malicious software (adware, spyware, ransomware etc.) for a wide range of illicit uses and data breach;
to rent MaaS (https://maas.io/) and / or other paid malicious services.
There are several software for creating these networks. Recalling that use for illegal purposes is punishable by law , some of the best known are:
Botnet Trojan Shark : it is a software for controlling Windows machines, it bypasses certain firewalls, all traffic sent is encrypted and also has keylogging capabilities;
Poison Ivy : as above, you can find l ink for download and a practical laboratory at this address.
PlugBot : is a Hardware Botnet, created for a research project. Official site .
Illusion Bot ;
Netbot attacker .
PBot Malware
A practical example: The PBot DDoS malware, used to launch Akamai’s largest DDoS attacks in Q2 2017. In the case of the PBot malware, malicious users used PHP code that dates back decades to generate a massive DDoS attack. The attackers managed to create a mini DDoS botnet capable of launching a 75 gigabits per second (Gbps) DDoS attack. It is interesting to note that the PBot botnet was made up of a relatively small number of nodes, about 400, yet capable of generating a significant level of attack traffic.
Contrast and international analysis
Botnets are one of the main security risks in recent years, as they are able to give computing power and bandwidth to people with not strictly legal purposes. Detecting them and putting them offline requires a disproportionate amount of time and energy, as finding an infected machine does not necessarily imply being able to trace the botmaster (especially if controlled by TOR , for example).
Dida figure: Dridex trafficking
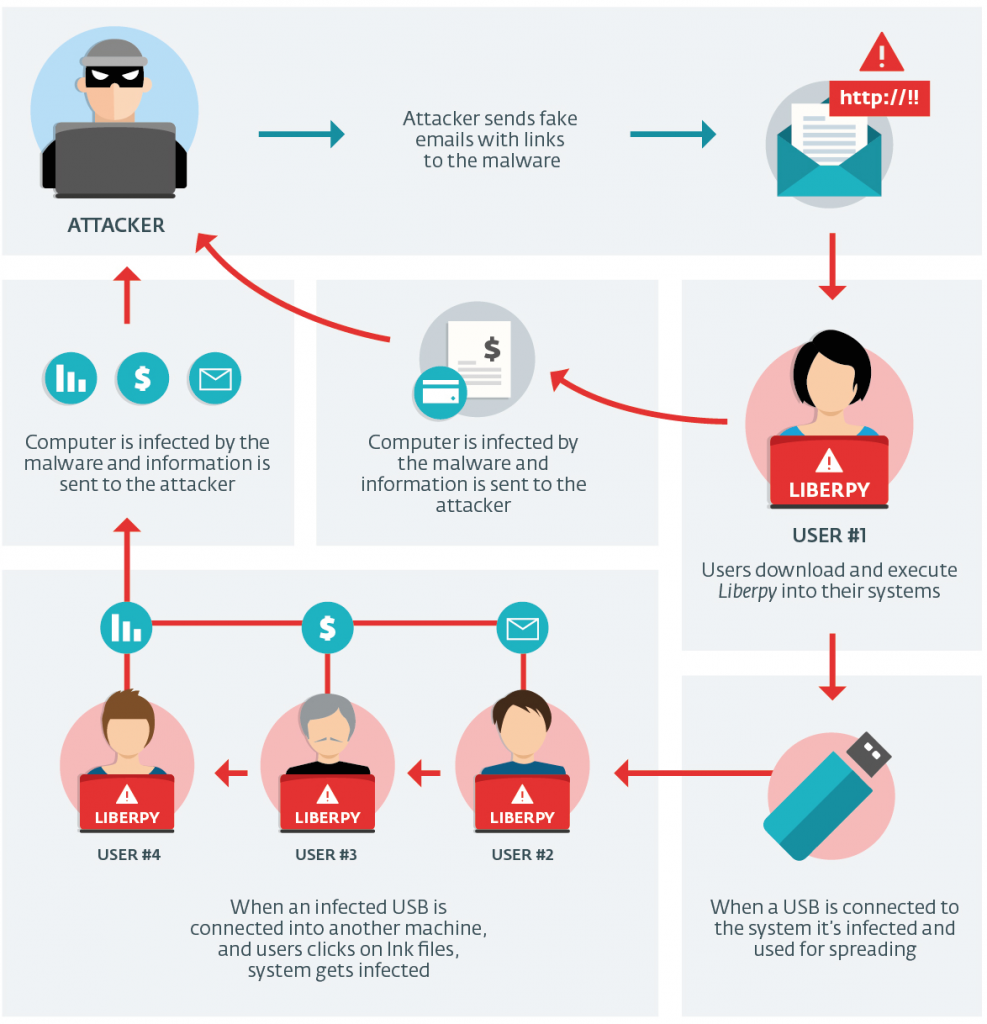
A cybersecurity team was able to largely analyze the Dridex botnet and the traffic it generates (it is still active). This propagates through email attachments ( never open them without first analyzing them ), and is auto-sent to the contacts in the victim’s address book. The analysis, in English, can be found at this address (of particular interest also the video ). Another aspect to consider and analyze consists of the malicious activities detected in the last month around the world, organized in a video that can be downloaded or viewed directly from here.
Recently, the news about the disappearance of the world’s largest Botnet has made headlines. This fact has vanished , simply disappeared without leaving a trace of itself. It was already it was destroyed in October 2015, by a task force of NCA and FBI, but somehow she was resurrected and returned to “work”, spreading the ransomware Locky . More details can be found at securityaffairs and vice .
How to defend against botnets
The defense against this ever-changing threat is to protect the network and potential accesses, i.e. users (who should be properly educated about the threat and its management).
A fundamental role is played by the human factor and by all those aspects related to users’ carelessness in respecting good safety rules.
In fact, an infected email, the download of an uncontrolled program or an exlpoit that exploits security flaws to make a device (PC, mobile device, IoT system) become a zombie is enough. So here are some minimum security tips for users to always keep in mind:
update your device with the latest versions of the operating system and / or firmware;
protect your device with up-to-date antivirus and firewall applications;
download trusted and verified software / app and update it periodically;
pay attention to attachments and links in e-mail messages.
Defense for companies – How to reduce exposure to botnet risk
Defense certainly passes through the digital education of users, but it is also true that companies themselves can develop some precautions to defend themselves. In particular, some basic precautions are:
Use tools to stop the flow of unwanted and high-risk emails containing malicious attachments;
provide tools to filter outgoing content from the corporate network, access and limit exposure to threats, in order to prevent any interactions between an established malware bot and its C2 server;
counteract any lateral spread of the infection, within the network, by implementing restrictions on the trust relationships of domains and local administrative accounts;
intensify detection of unusual activity through improved network and connection monitoring;
offer training and frequent updates to employees on network security support rules on cyber threats and any scams perpetrated through phishing or other techniques.
La parola Botnet deriva da roBOT NETwork. Come già anticipa il termine, si tratta di una rete formata da dispositivi informatici compromessi (infettati quindi da Malware) e collegati ad Internet, controllati da un unica entità, il botmaster. Una Botnet può avere sia scopi benevoli che malevoli, e può:
agire su una grande rete di computer da remoto;
analizzare automaticamente i dispositivi e le reti ad essi collegati;
L’attaccante necessita, prima di tutto, di una macchina compromessa e infettata da utilizzare come zombie. Il Bot viene programmato per cercare altri dispositivi vulnerabili, infettarli a loro volta e creando cosi una larga rete di target compromessi.
L’attaccante crea un centro C&C (comanda e controlla) configurando e forzando i vari host a connettersi e ad aspettare istruzioni. Tramite quel centro è ora possibile comandarli contemporaneamente, lanciare attacchi DDoS (Distributed Denial of Service) o infettare altri dispositivi.
Principali tipologie di botnet:
Centralizzate: sono comandate da un unico C&C, il quale impartisce i comandi e le controlla in modo totale. Se il botmaster viene però rintracciato e reso innocuo, esse non svolgeranno più la loro funzione;
Decentralizzate (tramite p2p): sono collegate tra di loro come una rete di pari ed ognuna impartisce ordini ai nodi vicini. In questo modo, anche nel caso in cui ne venga fermata una, le altre continuano a compiere comunque il loro lavoro.
Il modo più semplice per controllare una botnet è quello di connettere ogni bot a un server remoto. In tal caso una singola sorgente di controllo potrebbe inviare comandi e aggiornamenti con metodi di comunicazione sincroni oppure asincroni, che si differenziano nel modo che segue:
Asincrono: basato su HTTP, prevede una connessione verso un server Web per caricare/eseguire istruzioni a intervalli predefiniti;
Sincrono: basato su IRC (Internet Relay Chat), consiste nell’instaurare un canale persistente (chat) tra i bot e il server IRC per ricevere i comandi in real time.
La centralità di queste configurazioni li rende, però, particolarmente vulnerabili. Infatti per annientare la funzionalità dell’intera botnet basterebbe semplicemente individuare e oscurare il server C2 (HTTP/IRC).
Le scelte degli hacker
Gli hacker si trovano quindi di fronte a diverse scelte:
La possibilità di implementare una modalità di comunicazione distribuita peer-to-peer (P2P). In questo scenario, in cui un dispositivo zombie può fungere sia da bot e che da server C2, non esiste alcun punto di riferimento da cui i bot ottengono le proprie istruzioni. Quest’ultima configurazione, anche se meno diffusa a causa della complessità realizzativa, risulterebbe meno vulnerabile ad un eventuale contrattacco. Sarebbe più problematico oscurare tutti i bot per annientare la funzionalità dell’intera botnet;
La possibilità di implementare una modalità di comunicazione mista. Una buona soluzione potrebbe essere quella di adottare una configurazione cercando di cogliere tutti i vantaggi delle modalità di controllo centralizzato/P2P. Ad esempio, creando una botnet P2P per comunicare con i server C2 tramite protocollo HTTP;
La possibilità di implementare una modalità di comunicazione utilizzando la rete TOR. Questa rete, come noto, essendo crittografata e progettata per essere anonima consentirebbe di nascondere le azioni botnet. Fine modulo
Obiettivo delle Botnet:
Consentire l’azione simultanea di centinaia di migliaia di dispositivi che potrebbero essere utilizzate dai botmaster con diversi scopi:
per eseguire attacchi DDoS (Distributed Denial of Service) su server Web, bersagliando con traffico anomalo un sito Web, allo scopo di sovraccaricare i servizi bloccandone il funzionamento;
per lo spamming. Le botnet infatti risultano essere i principali mezzi impiegati allo scopo;
per frodi web. La simulazione di clic su link pubblicitari o il caricamento in background di siti Web (magari estranei a queste attività), potrebbero essere fonte di profitti fraudolenti, qualora questi siti pagassero in base al numero di click o di visualizzazioni;
per minare Bitcoin, sfruttando la potenza di calcolo dei computer zombie;
perdistribuirealtri malware. Come visto, le infezioni botnet si diffondono attraverso malware/Trojan che, individuando le vulnerabilità di sistemi firewall o antivirus obsoleti (o non aggiornati), scaricano altri software malevoli (adware, spyware, ransomware etc.) per una vasta gamma di impieghi illeciti e data breach;
per noleggiare MaaS (https://maas.io/ ) e/o ulteriori servizi malevoli a pagamento.
Esistono diversi software per la creazione di queste reti. Ricordando che l’utilizzo per fini illeciti è perseguibile penalmente, alcuni tra i più conosciuti sono:
Botnet Trojan Shark: è un software per il controllo di macchine Windows, bypassa certi firewall, tutto il traffico inviato è criptato e ha anche funzionalità di keylogging;
Poison Ivy: come sopra, potete trovare il link per il download e un laboratorio pratico a questo indirizzo.
PlugBot: è una Botnet Hardware, creato per un progetto di ricerca. Sito ufficiale.
Illusion Bot;
Netbot attacker.
Malware PBot
Un esempio pratico: Il malware DDoS PBot, utilizzato per lanciare gli attacchi DDoS più imponenti registrati da Akamai nel secondo trimestre del 2017. Nel caso del malware PBot, utenti malintenzionati hanno utilizzato codice PHP che risale ad alcuni decenni or sono per generare un imponente attacco DDoS. Gli autori degli attacchi sono riusciti a creare una mini botnet DDoS in grado di lanciare un attacco DDoS da 75 gigabit al secondo (Gbps). È interessante notare che la botnet PBot era composta da un numero relativamente contenuto di nodi, circa 400, in grado tuttavia di generare un notevole livello di traffico di attacco.
Il contrasto e l’analisi internazionale
Le Botnet sono uno principali rischi per la sicurezza in questi ultimi anni, poichè riescono a dare una potenza di calcolo e di banda a persone con fini non propriamente legali. Rilevarle e metterle offline richiede una quantità di tempo ed energie spropositate, in quanto trovare una macchina infettata non implica necessariamente riuscire a risalire al botmaster (specialmete se controllata da TOR, ad esempio).
Dida figura: Traffico di Dridex
Un team di sicurezza informatica è riuscito ad analizzare in buona parte la botnet Dridex e il traffico che essa genera (è tutt’ora attiva). Questa si propaga tramite allegati mail (mai aprirli senza prima averli analizzati), e si auto-invia ai contatti presenti nella rubrica della vittima. L’analisi, in inglese, è possibile trovarla a questo indirizzo (di particolare interesse anche il video ). Un altro aspetto da considerare e analizzare consiste nelle attività maligne rilevate nel mese scorso in tutto il mondo, organizzati in un video che si può scaricare o vedere direttamente da qui.
Recentemente ha fatto scalpore la notizia a proposito della sparizione della Botnet più grande del mondo. Questa infatti è svanita, semplicemente scomparsa senza lasciar traccia di sè. Era già era stata distrutta nell’ottobre 2015, da una task force di NCA e FBI, ma in qualche modo era resuscitata e tornata al “lavoro”, diffondendo il ransomware Locky. Altri dettagli si possono trovare su securityaffairs e vice.
Come difendersi dalle botnet
La difesa contro questa minaccia in continua evoluzione è quella di proteggere la rete e i potenziali accessi, ossia gli utenti (che andrebbero adeguatamente educati sulla minaccia e sulla sua gestione).
Un ruolo fondamentale viene giocato dal fattore umano e da tutti quegli aspetti legati alle disattenzioni degli utenti nel rispettare delle buone regole di sicurezza.
È sufficiente infatti una mail infetta, il download di un programma non controllato o un exlpoit che sfrutta falle di sicurezza per far diventare un apparato (PC, dispositivo mobile, sistema IoT) uno zombie. Ecco quindi alcuni consigli di sicurezza minima per gli utenti da tenere sempre presenti:
aggiornare il proprio dispositivo con le ultime versioni di sistema operativo e/o firmware;
proteggere il proprio dispositivo con applicazioni antivirus e firewall aggiornati;
scaricare software/app attendibile e verificato ed aggiornarlo periodicamente;
prestare attenzione ad allegati e link presenti nei messaggi di posta elettronica.
Difesa per le aziende – Come ridurre l’esposizione al rischio botnet
La difesa passa sicuramente attraverso l’educazione digitale degli utenti, ma è anche vero che le stesse aziende possono mettere a punto alcune accortezze per difendersi. In particolare, alcuni accorgimenti base sono:
Utilizzare strumenti per interrompere il flusso di e-mail indesiderate e ad alto rischio di contenere allegati malevoli;
prevedere strumenti per filtrare i contenuti in uscita dalla rete aziendale, gli accessi e limitare l’esposizione alle minacce, in modo da scongiurare eventuali interazioni tra un malware bot insediatosi e il suo server C2;
contrastare l’eventuale diffusione laterale dell’infezione, all’interno della rete, tramite l’attuazione di restrizioni sulle relazioni trust dei domini e sugli account locali amministrativi;
intensificare il rilevamento di attività insolite attraverso un perfezionamento del monitoring della rete e delle connessioni;
offrire formazione e aggiornamenti frequenti ai dipendenti sulle regole di supporto alla sicurezza di rete sulle minacce informatiche e le eventuali truffe perpetrate tramite phishing o altre tecniche.
Chissà quante volte ci è capitato di vedere – presso esercizi commerciali, locali o parchi pubblici – cartelli che segnalano la presenza di reti WiFi gratuite o accessibili attraverso un semplice “like” su Facebook. Con buona probabilità, ognuno di noi ha utilizzato tali servizi almeno una volta, vuoi per necessità o semplicemente per quella che oggigiorno è una naturale attitudine a rimanere connessi a internet.
Come mai allora queste reti non godono di una buona reputazione? E in che modo vengono sfruttate da utenti malintenzionati? Nel prosieguo dell’articolo analizzeremo e creeremo un tipico potenziale scenario con lo scopo di intercettare le informazioni sensibili inserite dall’ignaro utente. In poche parole, la classica combinazione username/password.
Dal momento che le possibilità di intercettare traffico e dati interessanti in chiaro – dunque non crittografati dal ben noto protocollo HTTPS – mediante sniffer di rete (come wireshark, xplico, ferret) sono piuttosto scarse per via delle policy sempre più stringenti in fatto di sicurezza adottate da browser e sistemi operativi, ci industrieremo in un ben più efficace tentativo di phishing: d’altra parte è risaputo, l’anello debole di un sistema informatico si trova sempre davanti allo schermo!
Ancora una volta, precisiamo che effettuare le pratiche mostrate qui di seguito al di fuori di ambienti simulati o nei confronti di soggetti non consenzienti, può significare incorrere nelle prescrizioni di cui agli articoli 616, 615-ter, 615-quater, 617-sexies, 640-terdel nostro Codice Penale.
Cominciamo configurando sulla nostra distribuzione Linux uno dei framework più famosi nell’ambito degli attacchi wireless, ovvero il progetto wifiphisher:
Troviamo lo strumento già preinstallato in WifiSlax, un ottimo sistema operativo di origini catalane dedicato proprio al pentesting di applicazioni WiFi. Dobbiamo poi munire il nostro sistema (anche come macchina virtuale) di almeno una seconda scheda di rete WiFi che consenta l’iniezione di pacchetti e il monitor mode. Se stiamo utilizzando VirtualBox come piattaforma di virtualizzazione, ci basterà cliccare sull’apposito menù e spuntare il device:
Lanciamo il programma nel suo utilizzo base con il comando:
sudo wifiphisher
Una prima modalità prevede la possibilità di clonare un Access point – e creare il cosiddetto Evil twin – inviando pacchetti di modo da deautenticare tutti i client connessi in quel momento per poi forzarli a riconnettersi all’AP creato dal nostro script. Dopo aver modificato l’indirizzo MAC della scheda di rete attaccante per garantirci un minimo di anonimato, selezioniamo la rete target da clonare tra quelle proposte nel menù:
Vengono messi a disposizione quattro possibili scenari con cui adescare il client vittima; nella fattispecie, selezioniamo il numero 4 – OAuth login Page:
Un aspetto interessante di questa modalità di attacco, è che il tutto avviene in maniera automatica e piuttosto sbrigativa: la vittima vedrà apparire una finestra del proprio browser – sia desktop che mobile – la quale richiede l’inserimento di credenziali per poter proseguire nella navigazione (in questo caso quelle di Facebook):
Ed ecco come il terminale del programma ci restituirà indirizzo mail e password della vittima:
Se volessimo essere ancor più diabolici e aumentare le probabilità di successo, potremmo modificare a nostro piacimento i tag HTML della pagina web, magari inserendo un titolo più accattivante e in lingua italiana oppure rendere ancora più credibile l’URL generato dal server web. Troviamo le cartelle delle pagine HTML del server al percorso:
wifiphisher/data/phishing-pages
Una seconda modalità molto efficace del framework, prevede invece la creazione ex novo di un hotspot WiFi aperto da lasciare attivo in attesa di un malcapitato utente alla ricerca di una connessione internet. La community di wifiphisher, inoltre, si è adoperata per ampliare il numero di scenari di quest’ultima tipologia di attacco, mettendo a disposizione il seguente materiale:
Copiamo le cartelle scaricate al percorso indicato poc’anzi e rilanciamo lo script iniziale di installazione per avere anche questi add-on operativi. Eseguiamo dunque il programma con la seguente sintassi, specificando il nome della rete da usare come trappola e quello della pagina web dello scenario desiderato (parametro -p):
La vittima rileverà dal proprio device una nuova rete: come è possibile vedere dagli screenshot successivi, la finta maschera di login appare in primo piano anche con dispositivi Android:
Dopo aver visto ciò che può mettere in atto un potenziale attaccante, ci chiediamo quello che possiamo fare da internauti consapevoli per non incappare in brutte sorprese. Il mondo del software in questo caso ci dà solo parzialmente una mano: è possibile che qualche antivirus metta genericamente in allerta della pericolosità di una nuova rete rilevata ma di certo non fermerà l’utente in fase di inserimento delle credenziali. Nemmeno una VPN ci mette al riparo dalla malevola intercettazione: l’incapsulamento del traffico internet avverrà solo successivamente alla connessione all’Access point, e dunque quando avremmo già inserito i nostri preziosi dati.
É invece sicuramente utile tenere aggiornati i propri browser e prestare attenzione alla compilazione automatica che spesso propongono innanzi a nuovi form: URL e pop-up vari devono essere sempre esaminati con la dovuta perizia, premendo invio solo quando siamo certi di inviare i nostri dati al legittimo destinatario. Infine, per i siti più sensibili è consigliabile implementare il meccanismo di doppia autenticazione tramite SMS o token monouso a sei cifre generato da applicazioni per smartphone.
Per la serie “conoscerli per combatterli”, vedremo in questo articolo come iniettare del malware in un’applicazione Android. A fine 2017, il solo Grabos, codice maligno presente in oltre 150 app su Play Store, ha infettato più di 17 milioni di utenti Android (fonte: mcafee.com)e non si tratta né del primo né dell’unico malware presente su Play Store nascosto all’interno di applicazioni insospettabili (Figura 1, fonte: av-test.org).
Figura 1
È quindi evidente come si tratti di una minaccia molto comune. Per eseguire un’analisi di un’applicazione infetta bisogna innanzitutto capire come agiscono gli attaccanti: di seguito vedremo in dettaglio come una normale applicazione mobile possa essere alterata inserendo del codice ostile.
Disassemblare un’applicazione
Cosa bisogna fare per trasformare una applicazione lecita in una applicazione malware? Per prima cosa è necessario scegliere una app da infettare. Per scaricare l’applicazione, se non abbiamo un dispositivo Android a portata di mano, è possibile utilizzare un servizio come APK Downloader (https://apps.evozi.com/apk-downloader/) o simili.
Al fine di comprendere il funzionamento una semplice app è sufficiente, ma in generale, quando il target non è obbligato, è preferibile infettare un’applicazione che già richiede i permessi necessari al malware per non insospettire l’utente.
Dopo averla scaricata, bisogna disassemblare l’applicazione, in modo da poterla modificare a piacimento. Per svolgere il procedimento utilizziamo Apktool (vedi Riquadro 1) ottenendo i file in Figura 2 (in figura è mostrato l’output di APK Tool utilizzato attraverso APK Studio).
Figura 2
Tra i file prodotti, quelli che ci interessano sono contenuti nella directory smali/, la quale include tutti i file dell’applicazione scritti in Smali, dove Smali è un linguaggio basato su Jasmin che disassembla un file .dex in un formato più leggibile.
I file .smali rispecchiano il comportamento dell’applicazione d’origine ma presentano un difetto, ovvero che non essendo lo Smali un linguaggio di alto livello, risulta non immediatamente leggibile.
Se invece vogliamo capire per grandi linee come l’app è fatta e come si comporta, ci è più utile uno strumento come dex2jar che trasforma un file .dex in un archivio JAR (Figura 3).
Figura 3
Archivio JAR che può essere analizzato con un semplice decompilatore Java come JD-GUI. I file .class prodotti sono in genere meno affidabili di quelli .smali e, inoltre, con questa operazione, non è possibile la ricostruzione dell’APK.
Riquadro 1: Apktool
Apktool è uno strumento per effettuare il reverse engineering dei file binari di Android. In concreto permette di disassemblare l’app e, cosa ancor più importante, permette di ricostruire il file APK dopo aver apportato eventuali modifiche.
I comandi principali sono
apktool d <nome apk> per disassemblare
apktool b <nome directory> per ricostruire l’APK.
Oltre alla directory smali, che ci interessa particolarmente quando disassembliamo un file, abbiamo anche le directory original e unknown:
original contiene la cartella META-INF e il file xml che servono quando vogliamo ricostruire l’app mantenendo la firma originale;
unknown contiene i file e le cartelle che non sono parte di AOSP (Android Open Source Project).
Preparare il malware
Dopo aver disassemblato l’applicazione originaria, il passo successivo consiste nella scrittura dell’applicazione malware in Java con Android Studio. Per semplicità, creiamo un malware molto elementare, andiamo sul “classico”: in questo esempio scriveremo un’applicazione che legge gli SMS e li inoltra via email ad un indirizzo scelto dall’attaccante.
Se l’applicazione malware ha bisogno di permessi aggiuntivi rispetto all’applicazione ospite, questi vanno richiesti nel manifesto; nelle ultime versioni di Android vanno anche controllati, ed eventualmente richiesti, a runtime rispettivamente con ContextCompat.checkSelfPermission() e ContextCompat.requestPermissions() (a questo proposito si veda https://developer.android.com/training/permissions/requesting.html per maggiori dettagli).
Il malware per inviare un’email non usa un Intent né fa scegliere all’utente quale client usare, ma fa tutto in background utilizzando il server di posta di GMail (smtp.gmail.com). Quello che ci serve quindi è una classe che eredita da BroadcastReceiver e che non fa altro che rimanere in ascolto dell’arrivo di un SMS. All’arrivo di un messaggio ne estrae il mittente (msg_from) e il contenuto (msg_body) e invia una email:
Dove SendMail è una classe che si occupa di inviare le email ed usa internamente le API di JavaMail (javax.mail.*). Nel manifesto invece va specificato il receiver e l’azione ad esso associata nel seguente modo:
A questo punto costruiamo l’APK con Android Studio e proviamola sull’emulatore: se tutto funziona come previsto, disassembliamo l’applicazione appena creata, in modo da avere del codice Smali per il nostro malware da iniettare.
Iniettare il codice e ricostruire l’applicazione
Trasformiamo ora l’applicazione lecita in una applicazione malware. Per farlo, basta copiare il contenuto della directory smali/ (tranne android/) del codice del malware nella directory smali/ dell’applicazione ospite; faremo lo stesso per i file presenti in unknown/.
Dopo aver inserito il codice necessario, possiamo ricreare l’applicazione.
Per poterla installare ci occorre firmarla: è possibile usare Uber APK Signer da riga di comando o attraverso APK Studio; alternativamente possiamo utilizzare direttamente APK Signer e Zip Align.
Usiamo APK Studio per costruire (con APK Tool), firmare (con Uber APK Signer) e ottimizzare (con Zip Align) l’applicazione che adesso è pronta per essere installata o, eventualmente, per essere caricata su Play Store.
Installare e testare l’applicazione
Figura 4
Anche in questo caso l’installazione può avvenire attraverso un tool grafico come Apk Studio o direttamente con il comando install di ADB.
Ricapitolando, per aggiungere del codice ostile ad una app ci serve:
Disassemblare l’app ospite con APK Tool
Scrivere il malware con Android Studio
Costruire l’APK malware con Android Studio
Disassemblare il malware con APK Tool
Copiare la directory smali/ del malware in quella dell’app ospite
Costruire, firmare e ottimizzare l’app ottenuta con APK Studio
Installare l’app con ADB
Sembrano molti passi ma, anche se macchinosi, sono tutti molto semplici e immediati. Eseguiamo normalmente l’applicazione, che continuerà a fare il suo lavoro, ma al primo SMS ricevuto ecco scattare il comportamento da malware: invierà un’email e nel corpo ci sarà indicato il mittente e il testo del messaggio.
Una delle professioni centrali nel mondo dell’informatica è lo sviluppatore Java. Si tratta infatti di una figura estremamente richiesta, poiché il linguaggio Java, che domina il 4% del mercato mondiale. Secondo linguaggio di programmazione informatica in ambito aziendale più utilizzato da multinazionali e aziende, soprattutto del settore dell’e-commerce e del banking, viene prediletto, nonostante sia difficile da gestire e apprendere, soprattutto per la sua robustezza e quindi per la capacità di sopportare una utenza numerosa.
Decidere di investire in una carriera nella programmazione Java infatti permette di intraprendere strade diverse, inserendosi in molti settori del mercato nazionale ed internazionale, dalla sicurezza al banking, dal mondo dei videogames fino a quello delle applicazioni mobile, e molti altri ancora.
IL PROGRAMMATORE JAVA E IL PERFEZIONAMENTO DI TECNINF
Il lavoro di un programmatore Java si sviluppa a diversi livelli
front-end developer ovvero colui che si occupa dell’interfaccia utente, in parole povere quella parte del sito web con cui l’utente interagisce;
back-end developer indica invece uno sviluppatore che crea le fondamenta di un sito, quella parte che l’utente finale non vedrà mai ma che è alla base della sua esperienza di navigazione;
full-stack developer è invece la figura di programmatore più completa, poiché possiede conoscenze e competenze sia per il lato front end che back end.
Si tratta di una professione difficile ma piena di stimoli: è necessario avere un approccio analitico, preciso, scrupoloso e avere capacità di problem solving. Con il nostro corso di perfezionamento, Tecninf si concentra sul full-stack developer, andando ad affinare e perfezionare competenze già in possesso dei partecipanti, in modo da offrire una preparazione completa ed approfondita.
Lavorando con i nostri progetti infatti lo sviluppatore Java si troverà a dover fare fronte a siti web, applicativi e database con grandi bacini di utenza, e dovrà quindi condurre test, attività di debug per correggere malfunzionamenti, intervenire su codici sviluppati da altri.
Come cominciare? Quali i percorsi formativi da intraprendere per rispondere alle esigenze del mercato? Sicuramente una laurea in informatica è un ottimo punto di partenza ma, come in tutte le professioni, non si smette mai di imparare. E soprattutto, è fondamentale l’esperienza “sul campo”.
Noi di Tecninf offriamo gratuitamente percorsi di formazione che, nel caso di candidati validi e idonei, si tradurrà in un percorso di assunzione. I nostri corsi permettono ai partecipanti di maturare un’esperienza “on the job” all’interno dei team aziendali. Per accedere è necessario avere conoscenza della logica di programmazione, basi di JAVA, Database (sql) ed essere in possesso di un Diploma o una Laurea in discipline ad indirizzo Informatico
COSA FACCIAMO NEI CORSI TECNINF
I candidati sono supportati da tutor specializzati che li aiuteranno a partecipare alla progettazione, analisi e sviluppo del codice con metodologie e framework tra i più diffusi. All’interno del corso vengono strutturate sessioni di “proget work”, che simulano integralmente un progetto e tutto il ciclo di vita di un software trattando argomenti, tecnologie e metodologie di ambienti lavorativi. Qualche esempio? Tra le skills che i nostri candidati acquisiscono ci sono:
analisi e raccolta requisiti
programmazione front end e back end
fase di test e bug fixing
UAT
deploy
Attività che vengono accompagnate dallo studio, approfondimento e applicazione del linguaggio Java Base e Avanzato e Web, su Hibernate, Spring, Angular e progettazione e modellazione Database.
Al termine del percorso i partecipanti che avranno dimostrato volontà nell’apprendimento, serietà e passione potranno godere di un’ulteriore opportunità: quella di essere inseriti in importanti progetti aziendali con contratto lavorativo.
Tecninf quest’anno prende parte alla grande competizione internazionale The Standoff, una piattaforma cyber range realizzata dai migliori professionisti del mondo IT e della cybersecurity.
Si tratta di una battaglia cibernetica durante la quale diverse aziende di cybersicurezza ricevono il compito di proteggere attività commerciali che imitano società reali di vario genere dagli attacchi informatici provenienti da tutto il mondo. “City F” viene descritto dagli organizzatori dell’evento come un “gemello digitale di un agglomerato moderno” dove ogni oggetto “ha i propri sistemi IT che utilizzano esattamente le stesse applicazioni web, software, hardware, PLC e SCADA delle loro controparti nella vita reale”. 17 gli obiettivi aziendali tra banche, aeroporti, centrali elettriche, sistemi di trasporto e molto altro: tutti sistemi collegati in un sofisticato ecosistema che deve far fronte a 45 rischi critici su scala aziendale.
Una vera e propria simulazione in tempo reale di ciò che accade quotidianamente nel mondo della sicurezza informatica, a partire da minacce che simulano in tutto e per tutto quelle del mondo reale, scoprendo nuovi vettori e tecniche di attacco su ICS e SCADA. The Standoff quindi promuove il nuovo paradigma di sicurezza secondo il quale i sistemi di sicurezza informatica dovrebbero avere KPI collegati al business.
Per contrastare gli attacchi di 30 squadre white hat, che impersonano le minacce e gli attacchi ai sistemi informatici, sono state selezionate 5 squadre blu di difesa: Tecninf è tra queste. Un’occasione importante non solo per far conoscere il mondo della sicurezza informatica, ma anche per mostrare competenze, Skills e il know-how che rende Tecninf un leader del settore.
Fino al 17 novembre, Tecninf sarà onorata di accompagnare gli utenti e i clienti dietro le quinte della sicurezza informatica.
All’interno dell’evento infatti è possibile partecipare ad un virtual tour di 1 ora dove un esperto mostrerà i meccanismi alla base della sicurezza informatica: la risposta in tempo reale agli attacchi informatici, il controllo dei processi in funzione, il monitoraggio informatico e molto altro ancora, per conoscere e comprendere al meglio le best practice di sicurezza informatica che hanno reso Tecninf leader di settore nell’era del mondo interconnesso.
Utilizziamo i cookie sul nostro sito web per offrirti una esperienza di navigazione migliore. Facendo clic su "Accetto", acconsenti all'uso di tutti i cookie.
This website uses cookies to improve your experience while you navigate through the website. Out of these, the cookies that are categorized as necessary are stored on your browser as they are essential for the working of basic functionalities of the website. We also use third-party cookies that help us analyze and understand how you use this website. These cookies will be stored in your browser only with your consent. You also have the option to opt-out of these cookies. But opting out of some of these cookies may affect your browsing experience.
Necessary cookies are absolutely essential for the website to function properly. These cookies ensure basic functionalities and security features of the website, anonymously.
Cookie
Durata
Descrizione
cookielawinfo-checbox-analytics
11 months
This cookie is set by GDPR Cookie Consent plugin. The cookie is used to store the user consent for the cookies in the category "Analytics".
cookielawinfo-checbox-functional
11 months
The cookie is set by GDPR cookie consent to record the user consent for the cookies in the category "Functional".
cookielawinfo-checbox-others
11 months
This cookie is set by GDPR Cookie Consent plugin. The cookie is used to store the user consent for the cookies in the category "Other.
cookielawinfo-checkbox-necessary
11 months
This cookie is set by GDPR Cookie Consent plugin. The cookies is used to store the user consent for the cookies in the category "Necessary".
cookielawinfo-checkbox-performance
11 months
This cookie is set by GDPR Cookie Consent plugin. The cookie is used to store the user consent for the cookies in the category "Performance".
viewed_cookie_policy
11 months
The cookie is set by the GDPR Cookie Consent plugin and is used to store whether or not user has consented to the use of cookies. It does not store any personal data.
Functional cookies help to perform certain functionalities like sharing the content of the website on social media platforms, collect feedbacks, and other third-party features.
Performance cookies are used to understand and analyze the key performance indexes of the website which helps in delivering a better user experience for the visitors.
Analytical cookies are used to understand how visitors interact with the website. These cookies help provide information on metrics the number of visitors, bounce rate, traffic source, etc.
Advertisement cookies are used to provide visitors with relevant ads and marketing campaigns. These cookies track visitors across websites and collect information to provide customized ads.